
本文试图以一种简易的语言让你了解到RocketMQ的通信协议模块是如何设计的(毕竟市面上太多程序员自己都很难看懂的技术文章了)。另外如果想要深入了解通信模块,你需要具备Netty的知识。推荐Netty入门综述。
本文是RocketMQ源码分析系列之一,如有疑问或者技术探讨,可以email me,欢迎探讨.
remoting模块是RocketMQ的基础通信模块。
在分布式应用中,不可避免的一个问题就是跨进程的通信,此问题基本都通过RPC调用来解决。RocketMQ的Producer、Consumer与Broker之间的通信无疑也是通过RPC实现的。在讲解RocketMQ的通信模块之前,先来说关于高性能RPC调用三个重要主题。
- 传输
因为RPC的本质是进程间通信,采用什么样的IO通信模型在很大程度上决定了通信的性能。 - 协议
在网络通信传输过程中,因为发送端和接收端通常不能保证两边使用的是相同的编程语言,即使都是相同语言,也有可能CPU位数不一样,也会造成数据出错。另外因为数据包都是连在一起发送的,没法做消息区分。所以通常需要约定一个通信协议,协议规定好数据流中每个字节的含义。发送端要保证按照协议组装好数据流,接收端按照协议规定读出里面的数据。网络通信传输的是字节码,需要对消息进行编解码。
协议指RPC调用在网络传输中约定的数据封装方式,通常包括三部分:编解码,消息头,消息体。常见的消息体编解码方式是序列化。消息头负责存储方便编码以及方便扩展的元信息,例如语言版本,响应码等等。
- 线程
当通信消息传输完毕之后,通过什么样的线程模型处理线程请求也很重要。常见的模型有Reactor单线程模型,Reactor多线程模型以及Reactor主从模型。虽然多路复用的思想是一个线程handle多个连接,尽量减少线程切换的开销。但是如果客户端请求量大,很可能单线程处理不过来请求导致请求积压响应变慢。因此Reactor多线程模型就是IO操作和非IO操作分开。非IO的线程称为工作线程,客户端的请求直接被丢到线程池中,客户端发送请求不会堵塞。
接着我们来讲讲RocketMQ是怎么解决通信协议的“传输”、“协议”以及“线程”的。
传输
简单来说,RocketMQ的remoting模块通过Netty实现了IO多路复用的Reactor通信模型。在RocketMQ启动NameServer的时候,会执行NameServer初始化以及服务端通信对象RemotingServer的启动操作this.remotingServer.start();. start()方法会启动NettyRemotingServer的Netty服务端并初始化一个channel。1
2
3
4
5
6
7
8
9
10
11
12
13
14
15
16
17
18
19
20
21
22
23
24
25ServerBootstrap childHandler =
this.serverBootstrap.group(this.eventLoopGroupBoss, this.eventLoopGroupSelector)
.channel(useEpoll() ? EpollServerSocketChannel.class : NioServerSocketChannel.class)
.option(ChannelOption.SO_BACKLOG, 1024)
.option(ChannelOption.SO_REUSEADDR, true)
.option(ChannelOption.SO_KEEPALIVE, false)
.childOption(ChannelOption.TCP_NODELAY, true)
.childOption(ChannelOption.SO_SNDBUF, nettyServerConfig.getServerSocketSndBufSize())
.childOption(ChannelOption.SO_RCVBUF, nettyServerConfig.getServerSocketRcvBufSize())
.localAddress(new InetSocketAddress(this.nettyServerConfig.getListenPort()))
.childHandler(new ChannelInitializer<SocketChannel>() {
@Override
public void initChannel(SocketChannel ch) throws Exception {
ch.pipeline()
.addLast(defaultEventExecutorGroup, HANDSHAKE_HANDLER_NAME,
new HandshakeHandler(TlsSystemConfig.tlsMode))
.addLast(defaultEventExecutorGroup,
new NettyEncoder(), // 指定消息编码器
new NettyDecoder(), // 指定消息解码器
new IdleStateHandler(0, 0, nettyServerConfig.getServerChannelMaxIdleTimeSeconds()),
new NettyConnectManageHandler(),
new NettyServerHandler()
);
}
});
这里启动了Netty的服务端,可以看出是Netty的Reactor模型的体现。EventLoopGroupBoss负责IO的连接,EventLoopGroupSelector负责连接的处理操作。在启动服务端的同时,会初始化一个channel, 并赋予channel注册到一个默认的defaultEventExecutorGroup.
当Producer发送消息(例如“Hello world”)时候,首先rocketmq使用netty进行IO通信,Netty的pipeline在各个handler传递消息进行处理。1
pipeline.fireChannelRead(readBuf.get(i));
1 | public final ChannelPipeline fireChannelRead(Object msg) { |
协议
RocketMQ自定义的私有协议栈都是基于TCP/IP协议,使用Netty的NIO TCP协议栈方便的进行私有协议栈的定制和开发。使用Netty定义私有协议栈的步骤:
1. 自定义协议规则
RocketMQ协议分为以下四个部分:
- header data: 协议的头,数据是序列化【fastjson】后的json。 json的每个key字段都是固定的,不同的通讯请求字段不一样。
- body data: 请求的二进制实际数据。例如发送消息的网络请求中,body中传输实际的消息内容。
- length: 消息总长度。
- header length: 序列化类型&消息头长度。第一个字节表示序列化类型,后面三个自己表示消息头长度。
在RocketMQ源码中,通信的消息封装在RemotingCommand这个bean中,其属性可以看出RocketMQ通信协议:
1 | //RequestCode定义:当表示请求操作代码时候,请求接收方根据代码执行相应操作; |
2. 自己编写encoder和decoder
通过remoting模块可以发现通信过程中,RocketMQ服务器与客户端通过传递 RemotingCommand对象来进行交互。通过NettyDecoder/NettyEncoder对Remoting Command进行协议的编解码。
- 消息编解码 使用NettyEncoder.encode进行消息序列化
- 通信方式: RocketMQ支持三种方式的通信 同步/异步/单向oneway
- 通信流程
解码 RemotingCommand类中的decode方法 - 根据自定义的协议进行解析获取消息头部和消息体:1
2
3
4
5
6
7
8
9
10
11
12
13
14
15
16
17
18
19
20
21public static RemotingCommand decode(final ByteBuffer byteBuffer) {
int length = byteBuffer.limit();
int oriHeaderLen = byteBuffer.getInt();//获取报文头部的长度
int headerLength = getHeaderLength(oriHeaderLen);
byte[] headerData = new byte[headerLength];
byteBuffer.get(headerData); // 获得报文头部数据
//反序列化解析header data和RemotingCommand类
RemotingCommand cmd = headerDecode(headerData, getProtocolType(oriHeaderLen));
int bodyLength = length - 4 - headerLength; // 获取body长度
byte[] bodyData = null;
if (bodyLength > 0) {
bodyData = new byte[bodyLength];
byteBuffer.get(bodyData); // 获取报文提数据
}
cmd.body = bodyData;
//把body部分还原出来,也就是把消息内容
return cmd;
}
为了形象起见,我自己写了一个简单的producer发送消息的demo1
2
3
4
5
6Message msg = new Message("Topic2Test",// topic
"TagA",// tag
("Hello RocketMQ ").getBytes()// body
);
SendResult sendResult = producer.send(msg);
通过在decode方法中最后获取到的cmd设置断点会发现: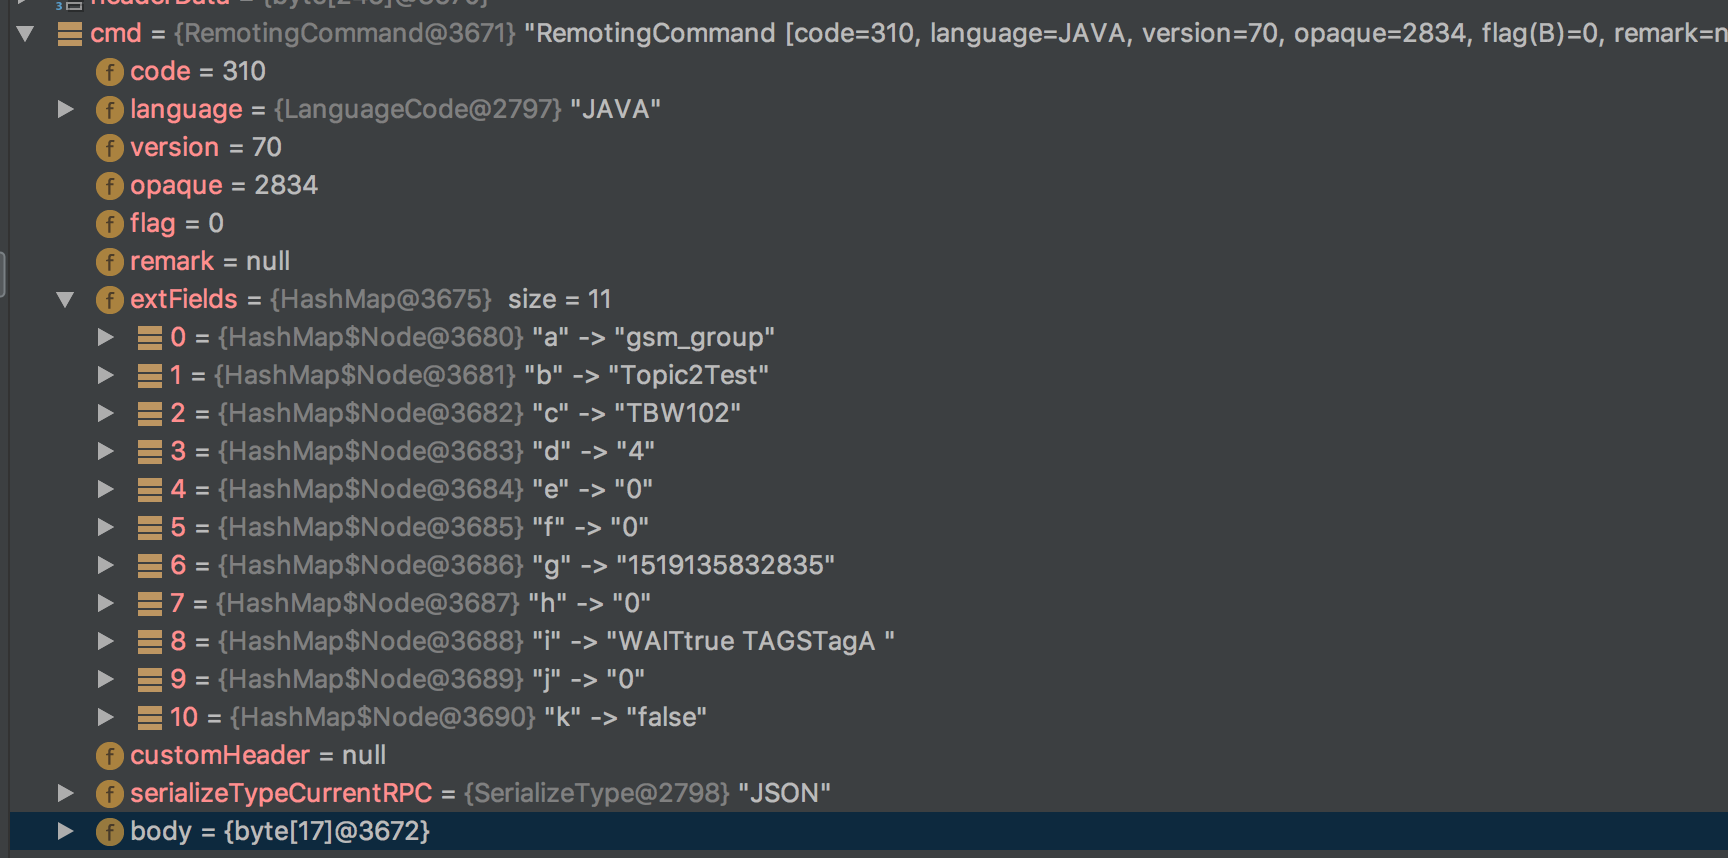
此时RemotingCommand的code为310,通过查阅RequestCode发现:1
public static final int SEND_MESSAGE_V2 = 310;
解码消息得知消息状态码为发送消息。并且发送方语言为JAVA,消息所在群组为gsm_group,消息的topic为Topic2Test。并且消息体Hello RocketMQ的字节码存储在了body里面。
3. 编写自己的应用Client&Server
remoting模块通过定义RemotingClient和RemotingServer实现了基于Netty通信的应用客户端和服务器。无论是客户端还是服务器都支持三种通信方式:
- invokeSync 同步通信
- invokeAsync 异步通信
- invoikeOneway 单向通信(不需要知道响应)
通信对象是上文提到的RemotingCommand,服务端对RemotingCommand进行解码,然后处理。
服务端(实现类NettyRemotingServer)和客户端(实现类NettyRemotingClient)继承了抽象类NettyRemotingAbstract并且实现了RemotingServer/RemotingClient.
抽象类NettyRemotingAbstract中定义了处理请求的方法processRequestCommand,处理响应调用的方法processResponseCommand.
当客户端与服务端进行通信时候
- 客户端发送请求给服务端,通过Netty的channel进行IO通信给服务端
- 服务端处理客户端请求。NettyServerHandler接收消息类型REQUEST_COMMAND,调用 processRequestCommand(ctx, cmd);
- 服务端处理完毕后,通过Netty的channel进行IO通信客户端
- 客户端处理服务端发送的响应,NettyClientHandler接收消息类型为RESPONSE_COMMAND,调用processResponseCommand(ctx, cmd)
1
2
3
4
5
6
7
8
9
10
11
12
13
14
15public void processMessageReceived(ChannelHandlerContext ctx, RemotingCommand msg) throws Exception {
final RemotingCommand cmd = msg;
if (cmd != null) {
switch (cmd.getType()) {
case REQUEST_COMMAND:
processRequestCommand(ctx, cmd);
break;
case RESPONSE_COMMAND:
processResponseCommand(ctx, cmd);
break;
default:
break;
}
}
}
服务端
服务端会针对每个访问请求查询其请求编码,根据请求编码使用相应的处理器(processor)进行处理。processorTable记录请求编码、处理器、线程池的关系。
1 | /** |
客户端
客户端使用responseTable记录所有响应。当客户端发送消息时候,会创建ResponseFuture异步响应结果。将每个响应的opaque与ResponseFuture组成的ConcurrentMap存储到responseTable.
1 | /** |
默认使用同步通信.因为服务端和客户度逻辑相似,这里以客户端为例,:NettyRemotingClient的同步通信实现如下:1
2
3
4
5
6
7
8
9
10
11
12
13
14
15
16
17
18
19
20
21
22
23
24 /**
* addr:为服务端地址,RPC调用需要制定服务端地址这样客户端才可以发送请求
* request: RemotingCommand封装的消息
*/
public RemotingCommand invokeSync(String addr, final RemotingCommand request, long timeoutMillis)
throws InterruptedException, RemotingConnectException, RemotingSendRequestException, RemotingTimeoutException {
final Channel channel = this.getAndCreateChannel(addr);
if (channel != null && channel.isActive()) {
try {
if (this.rpcHook != null) {
this.rpcHook.doBeforeRequest(addr, request);
}
System.out.println("invoke sync! request: "+request.toString());
// 同步通信,通信回应存储在reponse里
RemotingCommand response = this.invokeSyncImpl(channel, request, timeoutMillis);
if (this.rpcHook != null) {
this.rpcHook.doAfterResponse(RemotingHelper.parseChannelRemoteAddr(channel), request, response);
}
return response;
}
...
}
}
}
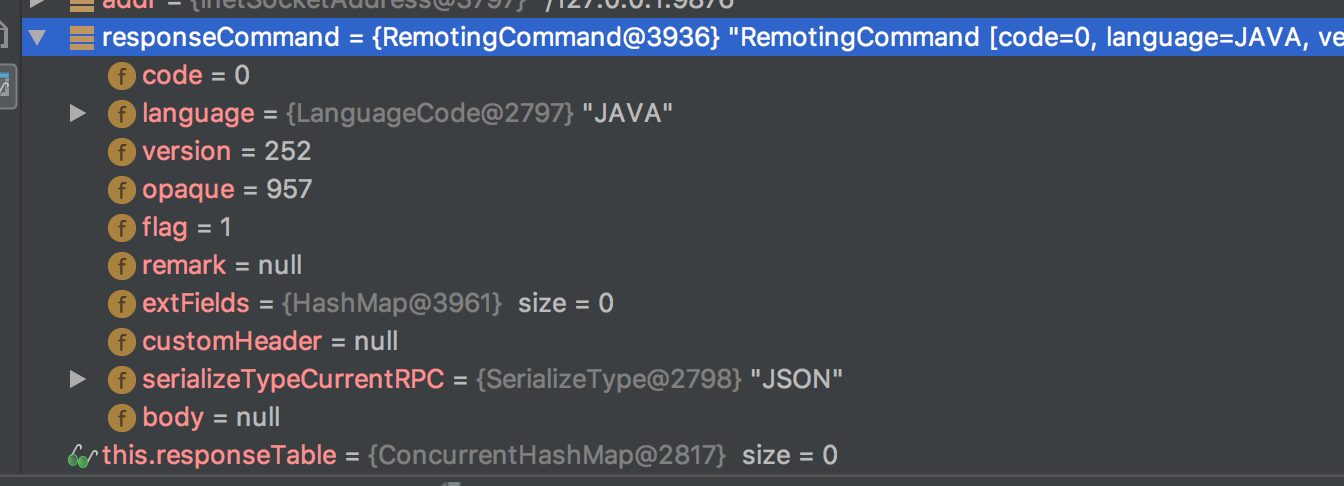
可以看出RemotingCommand当表示应答结果时候如果处理成功则code = 0。
核心处理为invokeSyncImpl方法1
2
3
4
5
6
7
8
9
10
11
12
13
14
15
16
17
18
19
20
21
22
23
24
25
26
27
28
29
30
31
32
33
34
35
36
37
38
39
40
41
42public RemotingCommand invokeSyncImpl(final Channel channel, final RemotingCommand request,
final long timeoutMillis)
throws InterruptedException, RemotingSendRequestException, RemotingTimeoutException {
final int opaque = request.getOpaque();
try {
final ResponseFuture responseFuture = new ResponseFuture(opaque, timeoutMillis, null, null);
// 客户端使用resonseTable,服务端使用processortable
this.responseTable.put(opaque, responseFuture);
final SocketAddress addr = channel.remoteAddress();
channel.writeAndFlush(request).addListener(new ChannelFutureListener() {
@Override
public void operationComplete(ChannelFuture f) throws Exception {
if (f.isSuccess()) {
responseFuture.setSendRequestOK(true);
return;
} else {
responseFuture.setSendRequestOK(false);
}
responseTable.remove(opaque);
responseFuture.setCause(f.cause());
responseFuture.putResponse(null);
log.warn("send a request command to channel <" + addr + "> failed.");
}
});
RemotingCommand responseCommand = responseFuture.waitResponse(timeoutMillis);
if (null == responseCommand) {
if (responseFuture.isSendRequestOK()) {
throw new RemotingTimeoutException(RemotingHelper.parseSocketAddressAddr(addr), timeoutMillis,
responseFuture.getCause());
} else {
throw new RemotingSendRequestException(RemotingHelper.parseSocketAddressAddr(addr), responseFuture.getCause());
}
}
return responseCommand;
} finally {
this.responseTable.remove(opaque);
}
}
首先构造一个ResonseFuture对象,Netty发送请求(writeAndFlush)并设置监听回调响应.
代码流程图参照下图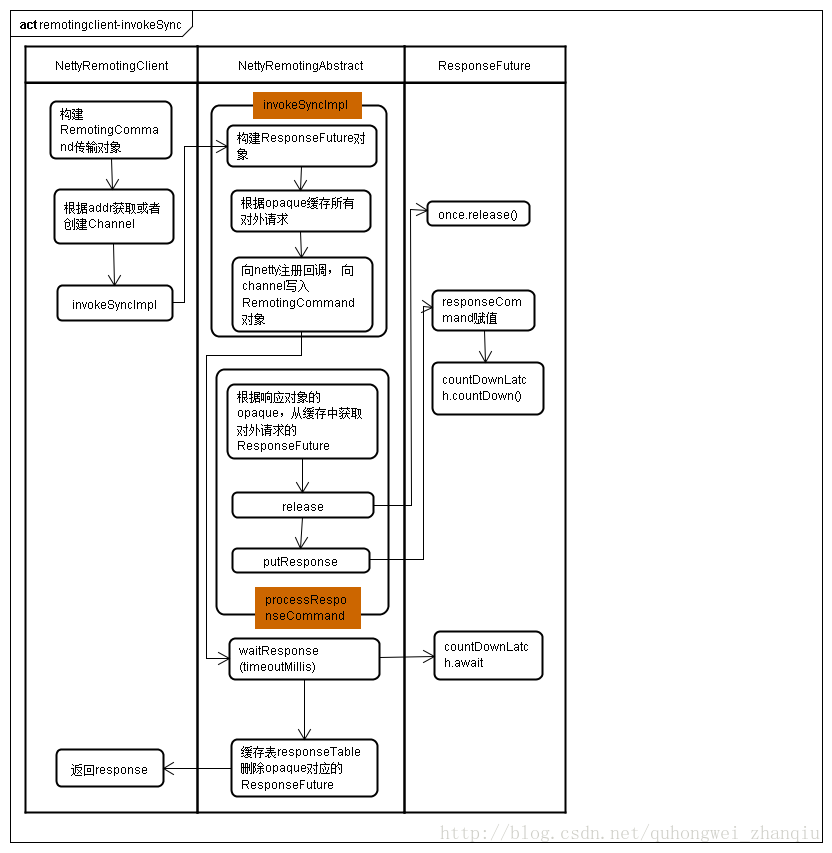
总结系列文章:
- RocketMQ源码分析1--Remoting
- RocketMQ源码分析2--NameServer
- RocketMQ源码分析3--Store数据存储
- RocketMQ源码分析4--Broker模块
- RocketMQ源码分析5--Client之Consumer模块
- RocketMQ源码分析6--关于RocketMQ你想知道的Questions